
If you want strong Waimea Valley luau photos, timing matters as much as your lens. Show up about two hours early and you can wander the garden paths, catch the smoke curling from the umu, and find a seat with a clean view of the stage before the crowd settles in. The 5:00 PM show gives you soft gold light, while the midday matinee makes rideshare easier. Then the real question starts: where should you stand when the fire comes out?
Key Takeaways
- Book the 5:00 PM luau and arrive by 3:30 PM for golden-hour portraits, pre-show activities, and easier scouting before low light.
- Choose the 12:30 PM matinee if using rideshare or bus, since it ends earlier and simplifies transportation.
- Walk the central paved path to Waimea Falls early, stopping at bridges, streams, heiau, and hales for soft-light garden and cultural shots.
- At Waimea Falls, shoot from the left side of the pool and arrive 20–40 minutes before sunset for warm light and glowing spray.
- Pick Gold or VIP lower-level seats for close hula and fire-knife shots, or slightly raised seats for wider stage-and-foliage compositions.
Best Time for Waimea Valley Luau Photos
For the best light, book the 5:00 PM evening luau and get there at least two hours early. You’ll catch golden hour in Waimea Valley, when the gardens glow and the falls pick up soft color instead of harsh midday glare. That timing also sets you up for stronger portrait shots before the Luau shifts into low light. As sunset fades, stage photos get moodier, especially during fire knife dancing, so pack a fast lens and don’t be shy about raising ISO. If you depend on rideshare or the bus, the 12:30 PM matinee is the smarter pick. It ends around 3:30 PM, while North Shore evening transport can feel like a scavenger hunt with fewer clues and no guaranteed ride home after dark. Since arrival tips matter for both seating and pre-show photos, plan your check-in around the luau’s start time so you’re not rushing your best daylight shots.
When to Arrive Before Toa Luau
Usually, you’ll want to reach Toa Luau well before check-in starts, not right as the conch shell is about to blow. Aim for at least two hours early so you can settle in at Waimea Valley, beat traffic, and still have time to shoot the warm late-day light before the evening show. For the 5:00 PM luau, getting there by 3:30 PM is a smart move.
Since it’s on Oahu’s North Shore, build in a little extra time if you’re driving from Waikiki or Honolulu. If you’re using rideshares or public transit, the 12:30 PM matinee is easier. Arrive 1–1.5 hours early for parking, check-in, and a few pre-show frames. Check Waimea Valley hours and waterfall status first. The valley opens at 9:00 AM, and the falls can close on some Mondays. Arrive early enough to catch food prep, the umu demo, too.
Best Garden Photo Spots in Waimea Valley
Along Waimea Valley’s central paved path, the photo options start almost right away and keep getting better as you head toward the 45-foot falls. Give yourself 15 to 40 minutes to wander the three-quarter-mile route and watch for framed vistas where dense native greenery opens just enough for a dramatic backdrop. In the lower valley, pause by the stream and little bridges. Shoot low for mirrored foliage, and use a polarizer if glare gets bossy.
For Cultural texture, explore the heiau and traditional hales at least two hours before the luau, when soft afternoon light flatters wood, stone, and thatch. You’ll also love the curated garden sections, where morning light suits flower close-ups. The pavilion and imu paths work well for environmental portraits too. If you arrive early, the Botanical Garden gives you extra time to scout compositions before the luau begins.
How to Photograph Waimea Falls Before Sunset
You’ll get your best waterfall shots if you arrive early enough to hike in and reach Waimea Falls about 20 to 40 minutes before sunset, when the light turns warm and the spray starts to glow. The walk to Waimea Falls is short enough that arriving a bit early gives you time to settle in and test a few compositions before the light peaks. Stand on the left side of the pool as you face the falls, then frame the scene with glossy tropical leaves or a person in the foreground so the 45-foot drop feels even more dramatic. It’s a simple setup, but the sound of the rushing water and that last soft light make you work a little faster than you planned.
Best Light Timing
Often, the best photos at Waimea Falls come when you reach the 45-foot cascade well before luau check-in, not when the sun is glaring straight down.
- For a 12:30 PM matinee, walk the 0.75-mile paved path early and arrive around 10:30 or 11:00 AM. You’ll get bright late-morning light without brutal noon shadows.
- For the 5:00 PM show, aim for 2:30 to 3:00 PM. In summer, the 3:30 to 5:00 PM window gives Waimea softer light, calmer highlights, and richer greens as golden hour approaches.
- If clouds roll in, smile. Overcast skies make exposure easier on water and foliage. On clear days, pack a polarizing filter to cut glare. That small tweak can make your Luau experience look wonderfully polished in every frame.
Before you lock in your photo schedule, double-check hours and tickets so your ideal waterfall timing lines up with Waimea Valley entry details.
Framing The Falls
Before the luau begins, give yourself at least two hours to reach Waimea Falls and look for your best angle. The paved 0.75-mile walk takes 15 to 40 minutes, so arriving early lets you scout before sunset instead of rushing from Waimea Bay. For a frame, stand on the viewing platform and use a wide lens, around 24 to 35mm, to pull in the 45-foot cascade, taro fields, and botanical garden.
If you’re photographing people, place them off-center and use rock ledges for texture. Get to the falls 45 to 60 minutes before sunset for side light on the cliffs and leaves. Expose for highlights and keep shutter speed at 1/250s or faster. Want silky water? Use a tripod, ISO, and an ND filter. If you also plan to swim, review current swim tips before you go so you can balance photo timing with conditions at the falls.
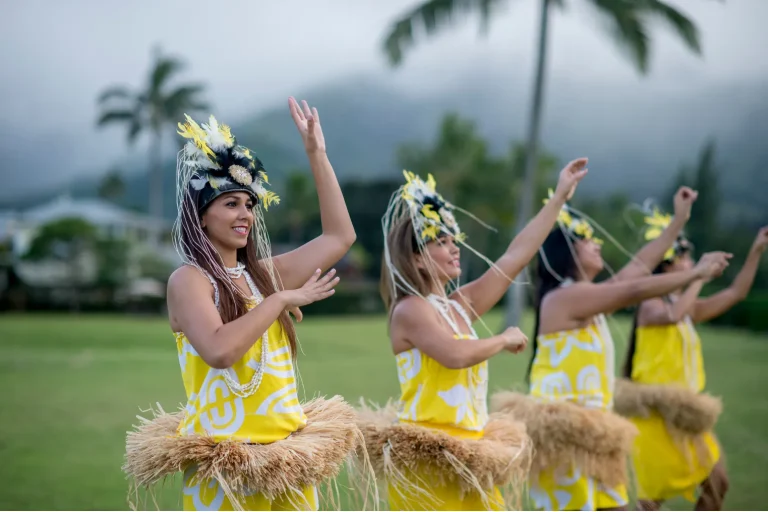
Best Places to Stand for Luau Photos
For the clearest luau shots, your position matters as much as your lens. Choose your spot with intent, and the evening opens up fast.
- Book Gold or VIP front-row seats on the bottom level if you want close views of lower-stage performers and the fire knife. Near the center aisle or table edge, you’ll dodge heads, plates, and other accidental souvenirs.
- Move toward the back or a slightly raised area for wider frames. From there, you can pull in the stage, hales, and Waimea Valley foliage for a stronger sense of place.
- Arrive two hours early and wander. The umu and kava pavilion look great in softer light, and earlier afternoon paths lead to calmer waterfall and botanical portraits before the crowds drift in.
- Before the performance begins, check the venue’s photo policy so you know whether you can take photos during the luau show without disrupting the experience.
How to Shoot Hula and Fire Knife Dance
You’ll get stronger luau photos when you treat hula and fire knife dance as two very different lighting puzzles. For hula, you want crisp hands, bright leis, and clear faces from a clean angle like the center aisle or Gold lower-level seating. For fire knife, you’ll balance flame trails with sharp motion and watch your exposure closely, because the stage can fool your camera faster than a spinning torch. Using camera settings suited for luau night photography can help you hold detail in both the performers and the flames.
Capture Hula Motion
Lean into the rhythm of the show and match your settings to the movement in front of you. At an evening show, you’ll get sharper keepers when you choose your seat with intention and anticipate the beat.
- Sit in the Gold lower-level section for eye-level faces and hula hand motions. Pick a centered elevated seat when you want full-body lines and group patterns. The Premium Seating options can also help you choose sightlines that suit either close facial expressions or wider stage coverage.
- Freeze swaying skirts and kaholo steps at 1/500s or faster. For a softer, dreamier feel, pan at 1/60 to 1/125s and let the background blur.
- Watch for MC cues, drum crescendos, hip shocks, and knife spins. Fire short bursts right before the peak. You’ll catch the moment, not your neighbor’s phone in the air while the conch shell hums somewhere nearby.
Fire Knife Exposure
Once the torches come out, your settings need to get a little bolder. For the fire-knife dance, use shutter-priority or manual and keep shutter speed at 1/200s minimum. For crisp spins and hula hands, open to f/2.8 to f/4 and raise ISO from 800 to 3200 as the light drops. Continuous AF and burst mode help you catch the split second when flame, face, and knife all line up.
At the Waimea Valley luau, the Fire Knife Dance is a key moment to anticipate when planning your timing and exposure changes. A 24-70mm or 24-105mm lens gives you stage context without losing detail from Gold or lower-level seats. If you want glowing trails, slow to 1/60 or 1/125 and brace yourself well. Dusk works best. Keep 10 to 15 feet from active swings, watch for embers, and don’t swap lenses unless you enjoy ash facials tonight.
Best Performance Angles
If you want the strongest angles, the Gold section on the lower level gives you the best shot at both hula detail and fire-knife drama. From there, you’ll catch hands, smiles, and swirling skirts without brutal cropping. The Gold section is widely considered one of the best seats at the Waimea Valley Luau for close, dramatic performance photography.
- For hula, shoot softer songs at f/2.8 to f/4 and 1/125 to 1/250s, so faces stay crisp while hands blur beautifully.
- For the fire-knife dance, sit centered front on the lower level and use 1/500 to 1/1000s to freeze flames against the dark.
- Listen for drumming and MC cues, then start burst mode before turns, tosses, or poses. A 70 to 200mm f/2.8 helps from any Gold section seat. Raise ISO to 800 to 3200 as evening light fades, unless you enjoy accidental abstract art by mistake tonight.
Best Camera Settings for Luau Lighting
Because luau lighting shifts fast from bright valley sun to smoky torchlight, your camera settings need to move with it. For the 12:30 matinee, start at ISO 100 to 400, f/2.8 to f/4, and 1/250 to 1/500s. By 5:00 PM, raise ISO to 800 to 3200 and keep shutter near 1/250s. If you are recording as well, use your phone camera and stabilize for smoother luau performances in changing light. For fire-knife performances, try ISO 400 to 800 and 1/60 to 1/125s for flame trails. Shoot RAW, dial minus 1/3 to 1 EV, meter on skin, and warm white balance to 3000 to 4000K. You’ll keep Hawaiian culture glowing, not muddy after dark.
| Scene | Settings | Picture |
|---|---|---|
| Matinee | Low ISO, quick shutter | Bright leis snap |
| Evening | Higher ISO, wide aperture | Smoke, drums, amber faces |
| Fire dance | Lower ISO, slower shutter | Flames curl like ribbons |
Best Lenses and Gear for Luau Photos
You’ll get the most from luau photos when you pack a flexible zoom, a bright prime, and enough reach to frame dancers and fire-knife action without fumbling for lens swaps. You’ll also want low-light gear that keeps up after sunset, especially when drums start pounding and the stage glows against the evening sky. Don’t forget the small essentials like extra batteries, fast SD cards, and a monopod or compact tripod, because the best shot rarely waits for you to get organized. If you plan to capture video too, low-light footage improves when you stabilize your camera and avoid pushing settings beyond what the scene can support.
Best Lens Choices
Start with a fast standard zoom, and the rest of your kit gets much easier to plan. A 24 to 70mm f/2.8, or 24 to 105mm f/4, lets you move from audience reactions to mid-stage dancers without missing the pulse of Oahus North Shore. If you arrive by car, review Waimea Valley parking tips for luau nights so you can get in smoothly and start shooting before the best pre-show light fades.
- Add a 70 to 200mm f/2.8 for fire-knife action and tight portraits from Gold or rear seats. You stay back, frame the heat, and isolate expressions.
- Bring a 16 to 35mm for cultural demonstrations, the umu, and waterfall portraits if you arrive early.
- Slip in a 50mm or 85mm prime for leis, food, and candid faces with soft background blur. Your bag stays nimble, not comedy-level overpacked. You’ll cover nearly every scene before dinner drums start rolling.
Low-Light Camera Gear
Once the sun slips behind the valley walls, your lens choices matter even more than your seat. You’ll want a fast prime like a 35mm f/1.8 or 50mm f/1.4 for crisp portraits and cleaner dance shots without pushing ISO too hard. If you love variety, bring a 24–70mm f/2.8. It gives you room to frame singers, dancers, and quick fire-knife moments while holding shutter speeds around 1/250 to 1/500.
Your camera body matters too. A full-frame model with strong high-ISO performance, like a Sony A7 III, Canon R6, or Nikon Z6 II, keeps noise under control in dim pavilion light. If you’re seated farther back, a 70–200mm f/2.8 helps you capture tight performer expressions with that polished Polynesian Cultural look from your dinner table. If you book the VIP package, that closer seating can make low-light luau photography easier by reducing how often you need longer focal lengths.
Must-Pack Photo Accessories
Pack smart, and the whole luau gets easier to photograph from the first garden stroll to the last burst of firelight. Since this guide covers what to bring, keep your gear compact and easy to carry through the evening.
- Bring a 24–70mm f/2.8 or 24–105mm f/4. You’ll frame the stage, dancers, and flower lei closeups without fumbling through lens swaps during the three-hour show.
- Add a 70–200mm and a camera body that handles ISO 3200 to 6400 well. From upper seats, you’ll catch drummers, sparks, and the fire-knife dancer with crisp separation.
- Tuck in a fast 50mm or 85mm prime, a monopod or travel tripod, extra batteries, two memory cards, plus a circular polarizer and light ND filter. Those small helpers matter in the botanical gardens, at the waterfall, and during dim kava ceremony scenes before sunset when shadows stretch and drums start.
How to Capture Natural Luau Candid Shots
If you want luau candids that feel easy and real, arrive about two hours early and wander the pre-show activities while everyone’s still relaxed. You’ll catch coconut husking, hula lessons, and the kava ceremony when smiles look unforced and pavilion light stays bright and even. Waimea Valley Luau’s pre-show activities give you a natural mix of cultural demos and guest interactions before the main performance begins. Bring a 35mm or 50mm prime, shoot around f/1.8 to 2.8, and keep ISO 400 to 800 for crisp frames during the 12:30 PM matinee.
For table-side moments, choose Gold or lower-level seating so you can photograph guests being served with the onsite food prep in view. Those background details tell the story. At the 5:00 PM show, switch to a 70 to 200mm f/2.8 or a camera that handles ISO well for firelight and movement during cultural activities.
How to Photograph Cultural Demos Respectfully
Photographing cultural demos well starts with reading the room before you raise the camera. At Waimea Valley, you’re documenting a cultural experience, not collecting trophies. Ask before shooting close-ups of coconut husking or a Native Hawaiian kava ceremony. If someone declines, smile, step back, and frame a wider scene. Curiosity beats elbows and leads to warmer frames.
A respectful lei greeting can also make candid arrival photos feel more personal and grounded in the luau experience.
- Skip flash in dim demos. Let firelight, chant, and shadows hold the mood. Raise ISO, use a fast lens, or brace a monopod.
- Build context. Include the umu, demonstrator, and watching guests so the practice stays rooted in place.
- Listen for cues. Check restrictions with staff or the MC, avoid sacred areas, and wait for the demonstrator’s signal during lei giving or hula lessons.
Common Luau Photo Mistakes to Avoid
While the Waimea Valley luau feels easygoing, a few small camera mistakes can turn bright hula skirts and fire-knife spins into muddy, missed shots. At the 5:00 PM show, don’t aim into the setting sun. Put performers in front light so faces stay clear and highlights don’t blow out.
Skip flash. It distracts dancers and may clash with venue rules. For evening action, don’t lean on sky-high ISO alone. Use fast glass at f/1.8 to f/2.8 and keep shutter speed at 1/250s or faster. Stay seated so you don’t block views, then step into the aisle briefly when you shoot. Your luau ticket gives you solid sightlines already. On the day of your Luau, arrive two hours early for lei greetings, coconut husking, umu prep, and softer daylight too. That extra time also lets you photograph lei greetings and other arrival moments before the finale begins.
Simple Waimea Valley Luau Shot List
Start with a quick circuit through Waimea Valley so your photo set builds a story from the first frame to the last. Arrive two hours early to explore the valley, catch botanical gardens, and frame the waterfall in soft afternoon light before the luau starts. For a smoother luau check-in, plan to arrive about two hours before the event begins so you have time to settle in and start shooting without rushing.
- Photograph coconut husking, hula lessons, and the kava ceremony. Move in close for hands, smiles, and quick portraits.
- At dinner, grab candid plating and tight food shots. Kalua pork, Island Mac Salad, Pupukea Green Salad, and haupia all look better before anyone digs in.
- For the show, stand near lower-level seating or an aisle. Shoot drummers and fire-knife dancers from nearby, then finish with wide stage views at dusk. You’ll leave with a clean sequence, not a random camera roll.
Frequently Asked Questions
Are Professional Cameras Allowed at Waimea Valley Luau?
Yes, you can bring professional cameras to Waimea Valley Luau. You should avoid flash, keep professional equipment compact, and check with staff about photography permits or restrictions when you arrive, since policies can change anytime.
Can I Fly a Drone Over Waimea Valley?
No, you can’t usually fly a drone over Waimea Valley. Like a hawk hitting headwinds, you’ll face strict drone regulations and likely need flight permits; unauthorized flights risk FAA violations, fines, safety issues, and privacy complaints.
Where Can I Safely Store Camera Gear During the Luau?
You can store camera gear in check-in locker rentals, under your table in a lockable sling, or in your car. If you swim, use a waterproof case or dry bag, and don’t leave anything unattended.
Is Smartphone Photography Good Enough for Luau Photos?
Yes, you’ll get great luau photos with your smartphone: move closer, frame tighter, shoot smarter. Use smartphone techniques, low light settings, HDR, and portrait mode, and you’ll capture dancers, fire-knife action, costumes, and vibrant backdrops beautifully.
What Should I Wear for Comfortable Luau Photography?
You’ll stay comfortable wearing breathable cotton or linen, lightweight layers, and tropical colors that photograph well. Choose grippy footwear for paths and gardens, skip bright white, and bring a light jacket for cooler evening hours.
Conclusion
Arrive early, follow the garden paths, and let the valley unfold frame by frame. You’ll catch soft light on broad leaves, smoke curling from the umu, and the first drumbeats under a pinking sky. Settle into a slightly raised seat, keep your lens ready, and stay alert for small moments between the big ones. When the fire knife spins and the night deepens, you’ll have the shots, and maybe a little ash on your sleeve too.